Aug 31, 20222 min read


Microsoft has delivered a mobile-first experience for Microsoft Teams Phone!
Currently, Operator Connect Mobile is available through Microsoft's Operator Connect Partners, BT, Rogers, Swisscom, Telia and Verizon. You no longer have to rely on the Teams app on your phone. Your cell phone natively becomes a Teams Phone endpoint! Inbound and outbound calling is routed via Teams because Teams becomes the cell phone's PSTN connection.
Benefits of using Operator Connect Mobile (OCM):
Use your cell phone's native dialer.
Teams policies apply for caller ID.
Outbound calls can show your corporate main number or call center number.
Power of Teams on your native mobile device.
Uses Teams voicemail.
Single platform for call history.
Teams presence will show you are using your cell phone.
Simultaneous ring or call forwarding is no longer needed.
Existing Teams compliance session recording solutions will work for both inbound and outbound calls on your mobile phone.
A few things missing as of release is SMS from your cell. You can still send text messages from your cell phone, but they will not flow or sync through Teams. However, this is on their roadmap and a feature you can expect. Your cell phone number needs to be managed by your business. Which means you can't use OCM with your personal Verizon account, your number must be transferred to your business mobile plan. OCM is only available if you are an Operator Connect customer. You cannot use OCM with a MS Calling Plan or Direct Routing.

Another great opportunity to enable your Mobile users to excel!
Updated: Mar 24, 2022
ONE SCRIPT TO ENABLE TEAMS DIALPAD

I need a clear and easy process to enable users for Teams Phone System, no matter how many users. I've done deployments with 10 users, sure I'll click my mouse 30 times. But anymore than 10, PowerShell is my best friend. Not only does it help from making human mistakes, its fun to use!...Once you have working scripts :).
When I receive data from a customer, 100% of the time, it is not in the format I need. So I've gotten pretty good at Excel (good is a very
strong word for my Excel skills). When I am given something like this:

I need to be able to format line items PowerShell needs.
For this script I need their SIP address and I need to put their DID in E164 format. The email address is usually their email address (verify this). So I put my focus towards the DID.
I often question the need of 4 digit dialing with Teams, but I get asked about all the time. Also, if you have an Auto Attendant set up for Extension Dialing, you will need to include ;ext=xxxx so Teams knows what extension you are referring to. It is supported to have a different extension than your last 4 digits, and this is how you accomplish that as well.
First you need to copy the last 4 digits of the DID (assuming they match with your internal dialing). We will use empty cell C8 and will type:
=Right (C7,4)
The output will be:
1263
Now you need to create the full E164 number. In C8, type:
="tel:+1"&C7&";ext="&C8
The output will be:
tel:+11241581263;ext=1263.
Then clean up the spreadsheet with just the user's email address and TeamsDID and save it as a .csv file.
Now open PowerShell ISE in admin mode. I'm going to assume you already have the Teams module installed. But you will also need the MSOnline module (for assigning licenses).
Install-Module MSOnline
Connect-MSOLService
Then you'll also want to connect to Teams module.
Type:
Connect-MicrosoftTeams
Enter your M365 admin creds
Once loaded, you are ready to enable your users for Teams Phone System. To enable the dialpad in Teams, the user needs 3 things.
Phone System License (MCOEV)
Enterprise Voice Enabled
Assigned Voice Routing Policy
This script will cover all 3. Copy and paste into PowerShell ISE
#Script to Teams Voice enable users
Connect-MicrosoftTeams
{
$Users = Import-Csv -Path C:\temp\TeamsUsers2.csv
$sip = $user.user
$lineuri = $user.TeamsDID
ForEach($user in $Users) {
Set-MsolUserLicense -UserPrincipalName $sip -AddLicenses "MCOEV" -ErrorAction SilentlyContinue
Set-CsUser -Identity $sip -EnterpriseVoiceEnabled $true -LineURI $lineuri
Grant-csonlinevoicemailpolicy -Identity $sip -PolicyName Default
Grant-CsOnlineVoiceRoutingPolicy -Identity $sip -PolicyName "PolicyName" -verbose
}}
A few key things to note:
Update based on headers in your .csv file
AddLicense is the Phone System license (but that line can be used for other licenses as well)
Update -PolicyName to your Voice Routing Policy in Teams.
It could take up to 24hrs for the dial pad to show up in the Teams client.
Hope this helps!
I get asked often how to allow guest access aka federation for Microsoft Teams. Obviously, it is easy to change the settings in the Teams Admin Center, but there is wwwaayyy more to it.
Below are different areas to verify you have the correct settings set in your M365 deployment for guest access.
*This is for informational use only. I am NOT suggesting allowing guest access in every Teams environment is the right choice. So do your homework and make sure what you choose aligns with your security practices.
Allow guest access settings in Teams admin center
1) Go to your Teams Admin Center
2) Expand Users, go to Guest access
3) Click the drop down next to ‘Allow guest access in Teams’ and chose On
4) Go through the rest of the settings to turn On if needed

5) Under Messaging, turn On needed options

6) Click on External access
7) Click the drop down under ‘Select which external domains your users have access to:’
8) Select desired setting
a. If you chose ‘Allow only specific external domains’, add allowed domains

9) When both are on, outside Teams users can contact you using your sip address
10) If you check the box next to ‘External users with Teams accounts….’ Unmanaged external Teams users can start a conversation with people in your organization (less secure).

What can a federated user do?
Chat with users within your environment.
View files shared with them in chat messages.
What can’t a federated user do?
Search the user directory (excepting for email addresses and using Direct Routing/SIP).
Share files (remember, shared chat files go in the sharer’s OneDrive, and External Access does not enable a OneDrive, so there is nowhere to store the file).
Access Teams and Channel resources.
Participate in a Group chat (i.e., External Access is one to one chat ONLY so no starting a 1:1 and then adding someone).
View or set an Out of Office message / Status message.
Be blocked or Block someone.
Allow guest access settings in SharePoint admin center
1) Open SharePoint Admin Center
2) Expand Policies and click on Sharing
3) Select the level of sharing based on your needs

4) Expand ‘More external sharing settings’ and select settings needed

5) Select options to allow guests access to files and folders

Teams and SharePoint are connected in the following scenarios:
· When you create a new team from scratch, a new SharePoint site is created and connected to the team.
· When you create a new team from an existing Microsoft 365 group, the team is connected to the SharePoint site associated with the group.
· When you add Teams to an existing SharePoint site, that site is connected to the new team.
· When you create a new private or shared channel, a new SharePoint site is created and connected to that channel.
Guest access per site in SharePoint admin center
1) Open SharePoint admin center
2) Browse to Sites->Active sites
3) Click on the site you want to change
4) Click the Policies tab
5) Under External sharing, click Edit

6) Select preferred settings
The default settings are the Org wide settings you verified/set above. The permissions set here are for the site you chose

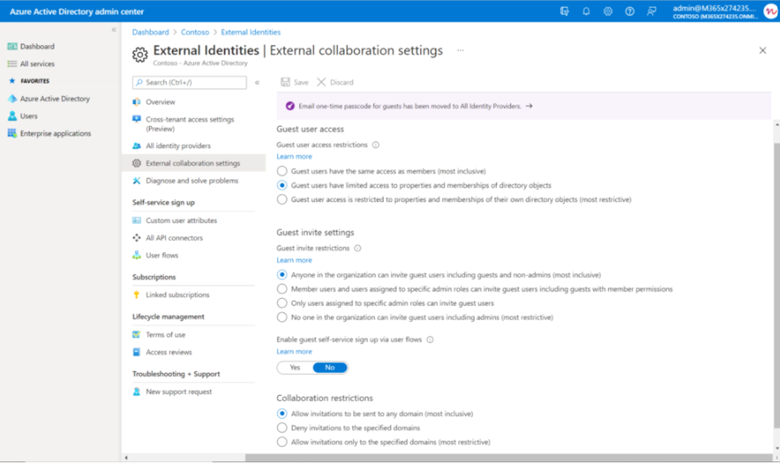
Allow guest access settings in Azure Active Directory admin center
7) Sign into Azure portal
8) Select Azure Active Directory
9) Browse to External Identities->External collaboration settings
10) Choose the level of restrictions for guests
Allow guest access settings in Microsoft 365 admin center
Microsoft Teams users Microsoft 365 Groups for team membership. For guest access to work in Teams, you need to set up Microsoft 365 Group guest settings.
1) Sign into Microsoft 365 admin center
2) Browse to Settings->Org settings
3) Under Office 365 Groups, both boxes should be checked

Monitoring external sharing activity
· Below are built-in alert policies concerning external sharing you can turn on in Office 365 Security & Compliance
Unusual external user file activity
Generates an alert when a large number of activities is performed on files by guest users in SharePoint or OneDrive. These activities include accessing, downloading, and deleting files.
Unusual volume of external file sharing
Generates an alert when an unusually large number of files in SharePoint or OneDrive is shared with people outside your organization.
Learn more about managing alerts.
· Configure sensitivity labels
What a sensitivity label is
When you assign a sensitivity label to content, it's like a stamp that's applied and is:
· Customizable. Specific to your organization and business needs, you can create categories for different levels of sensitive content in your organization. For example, Personal, Public, General, Confidential, and Highly Confidential.
· Clear text. Because a label is stored in clear text in the metadata for files and emails, third-party apps and services can read it and then apply their own protective actions, if required.
· Persistent. Because the label is stored in metadata for files and emails, the label roams with the content, no matter where it's saved or stored.
You can use sensitivity labels to:
· Provide protection settings that include encryption and content markings. For example, apply a "Confidential" label to a document or email, and that label encrypts the content and applies a "Confidential" watermark.
· Protect content in Office apps across different platforms and devices. Supported by Word, Excel, PowerPoint, and Outlook on the Office desktop apps and Office on the web. Supported on Windows, macOS, iOS, and Android.
· Protect content in third-party apps and services by using Microsoft Defender for Cloud Apps. With Defender for Cloud Apps, you can detect, classify, label, and protect content in third-party apps and services.
· Protect containers that include Teams, Microsoft 365 Groups, and SharePoint sites. For example, set privacy settings, external user access and external sharing, and access from unmanaged devices.
· Extend sensitivity labels to Power BI: When you turn on this capability, you can apply and view labels in Power BI, and protect data when it's saved outside the service.
· Extend sensitivity labels to assets in Azure Purview: When you turn on this capability, currently in preview, you can apply your sensitivity labels to files and schematized data assets in Azure Purview.
· Extend sensitivity labels to third-party apps and services. Using the Microsoft Information Protection SDK, third-party apps can read sensitivity labels and apply protection settings.
· Classify content without using any protection settings. You can also simply assign a label because of classifying the content. This provides users with a visual mapping of classification to your organization's label names and can use the labels to generate usage reports and see activity data for your sensitive content.
Additional guest access settings
Important to understand coexistence modes and where users will send/receive chats, calls, meetings, etc.
You can specify a coexistence mode:
· Teams only
· Islands (Teams and Skype for Business will coexist)
· Skype for Business only
· Skype for Business with Teams collaboration (Users receive chats and calls and schedule meetings in Skype for Business but use Teams for group collaboration)
· Skype for Business with Teams collaboration and meetings (Users receive chats and calls in Skype for Business but use Teams for group collaboration and to schedule meetings)
In Teams PowerShell, verify settings by running the below commands:
Get-CsTenantFederationConfiguration
Verify AllowedDomains lists all the allowed domains you entered or looks like below:

Get-CsExternalAccessPolicy
Verify your Global settings:


